
Running Flight Instrument Panels (FIPs) will drag the performance of the simulator to some extent. To minimize the impacts on some not so high-end PCs, off-loading them to a spare computer isn’t a bad idea.
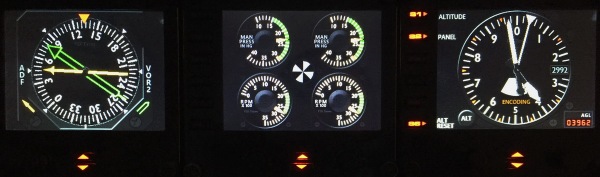
To those who are “network-phobia”, here’s an example how I put the FIPs (with some help from Ricardo in the first place) to work on a spare computer in my family network.
Some Terms to Familiarize
Server/Master Computer — the Computer that runs FSX or P3D
Client/Slave Computer — the Computer that runs the FIPs
SimConnect — a special utility that allows information exchange between the simulator and the addons.
Pre-requisite
1)
Both Master and Client Computers must be in the same network (for example, connecting to the same router).
2)
FIPs are installed and running properly with FSX or Prepar3D on the Master Computer.
This step is optional but it helps ensure the FIPs are running properly before they are moved to the client PC. You may uninstall the Saitek FIP driver after the moving. But be careful not to remove other Saitek drivers if you are using Switch Panel, Multi Panel, etc from Saitek.
Set Up on the Master Computer
1)
Install Microsoft Visual C++ 2005 Redistributable Package – x86 or x64, if it is not found on the computer. (search Microsoft Download or Click Here)
2)
Go to the directory of fsx.CFG — %appdata%\Microsoft\FSX
or
Go to the directory of Prepar3D.cfg —
%appdata%\Lockheed Martin\Prepar3D v2 (v3 or v4 or corresponding version)
3)
Look for SimConnect.xml from the directory mentioned above and make changes to it as following shows:
<SimConnect.Comm>
<Disabled>False</Disabled>
<Protocol>IPv4</Protocol>
<Scope>global</Scope>
<Address>192.168.1.xxx</Address> <– (IPv4 address of the Master PC)
<MaxClients>64</MaxClients>
<Port>747</Port>
<MaxRecvSize>4096</MaxRecvSize>
<DisableNagle>False</DisableNagle>
</SimConnect.Comm>
Note
1. See the last part regarding IPv4 address
2. Port number refers to any available port on the Master PC. Just use 747 if you are not sure.
Set Up on the Client Computer
1)
Install Microsoft Visual C++ 2005 Redistributable Package – x86 or x64, if it is not there. (This step may not be required if you are using Windows 10.)
2)
Copy and Install Simconnect.msi from the Master Computer. (This step may not be required if you are using Windows 10.)
For FSX:
The file is in the \SDK\Core Utilities Kit\SimConnect SDK\lib folder under FSX program directory. If it is not there, install the SDK package from FSX’s program DVD.
For P3D:
The file is in the redist\Interface folder under P3D program directory.
3)
Install FIP drivers
4)
Under the Documents (or My Documents) folder, create a file called SimConnect.cfg with the following content:
[SimConnect]
Protocol=IPv4
Address=192.168.1.xxx <– (IPv4 address of the Master PC)
Port=747
MaxReceiveSize=4096
DisableNagle=0
IMPORTANT:
DO NOT put this file onto the Master Computer; otherwise, it will cause errors to the simulator.
Starting Up
On the Master Computer, Start up FSX or P3D
On the Client Computer,
Connect FIPs (better use ONE FIP only for the first connection) to the Client computer
Then execute SaiFlightSimX.exe
The file could be found from either directory below:
C:\Program Files (x86)\Saitek\DirectOutput
or
C:\Program Files (x86)\Saitek\ProFlight FSX Plugin (when using new Saitek drivers)
The gauges should now show up on the FIPs.
TroubleShooting
Gauges don’t show up on the FIPs
Check if above Set Up procedures are prepared correctly.
Note that both Master and Client computers have to use the same SimConnect version. It means that if FSX Accelerator is installed on the Master PC, then the same Accelerator SimConnect.msi is required on the Client PC.
Lagging on the Gauges
Modify the value of the Gauge Timeout=”100″ in the SaiFlightSimX.xml on the Client computer.
Timeout value refers to the time the FIP reacts to the signal received from the simulator. The shorter the timeout, the more responsive of the FIP, but more system resources will be eaten up.
Since FIPs are directly connected to the Client PC now, reducing the value won’t drag the performance on the simulator.
However, it’s still required to be adjusted in order match the “strength” of the Client PC. A value of “20” is a good start.
Finding IPv4 Address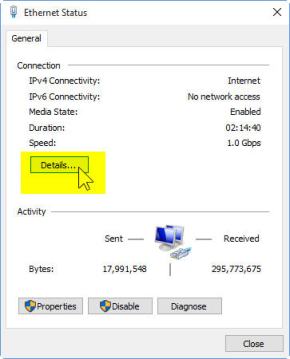
Open Network and Sharing Center under Control Panel on the Master Computer.
Click on “Connections” and then “Details…” will show up the IPv4 Address.
SimConnect.xml & SimConnect.cfg
Click here to download my SimConnect.xml for FSX or here SimCommect.xml for P3D.

I’m finding that running a lot of gauges on a second computer is much more stable. However, it is a pain to have to start up the FIP’s manually on that networked computer.
I found a good solution to the problem by using a Microsoft utility called PSExec. You can download the package here:
https://technet.microsoft.com/en-ca/sysinternals/bb897553.aspx
Amongst many things that is does is allow you to launch an application on a remote system. Combined with an addition to the FSX exe.xml file, i now have the FIP gauges start automatically when I launch FSX and quit, when i exit.
Install pstools on to your system in a folder of your choosing i.e. c:\pstools.
Add the following to the fsx exe.xml file
Network FIPs
False
C:\pstools\psexec.exe
\\ComputerName -h -i -u AdminUserName -p AdminPassword “C:\Program Files (x86)\Saitek\ProFlight FSX Plugin\SaiFlightSimX.exe”
In this example, Lenovo1 is the name of my 2nd pc, AdminUserName and AdminPassword should be valid local accounts on the 2nd PC with admin priveledges.
Some caveats:
1. Make sure that the 2nd computer is configured with simconnect and all works fine by manually launching the saitek program before attempting the remote launch.
2. The 2nd PC should automatically login on startup. Instructions for a windows 7 machine are here: https://technet.microsoft.com/en-us/magazine/ee872306.aspx
3. I have UAC (User Acccess Control) off on my second PC. Not sure if it will work when enabled.
4. If you use Remote Desktop to access the 2nd computer, do NOT launch a RDP session. The way that RD works is that each login is considered a different session with unique session id’s. It would be tricky to get PSEXEC to execute the saitek application in the RD session. Instead, it will launch into a different session that will not connect to your main fsx computer through simconnect.
Just have the 2nd computer startup and autologin and you should be fine. No need for a remote desktop session. However, something like VNC or Teamviewer for remote access should be no problem as that only works on the active session.
Hope this helps make running your sim with networked gauges simple and pain free.
Stef.
LikeLike
Thanks Stef.
Very Useful. Will put your tips as a standalone post.
Tom
LikeLike
No problems, Tom.
Looks like the xml tags got stripped when I posted this comment. The add-on launch section doesn’t make any sense as posted. I’ll send you the real XML snippet by email.
LikeLike
Thank you Stef. Just about to post the story with your tips.
Tom
LikeLike
I don’t remember seeing the gauges you show in this thread before. I have been out of touch for a while though, are they listed somewhere?
Rick S
LikeLike
I thought nobody notice that. They are newly made for Baron 58. Have finished a few of them and a few more to go.
Gauges of Bonanza A36 that have similar structure may come soon as well. I know my work is slow but they are definitely coming.
Tom
LikeLike
I likey, give me a heads up when you are ready Tom. The 58 is my favorite twin.
Thanks
Rick S.
LikeLike
Surely will.
Tom
LikeLike
Your Baron engine gauge looks similar to my Freeware gauges on FlightSim and Avsim, except I left the prop sync off because I didn’t feel like messing with it. I’m sure yours will be DELUXE versions with avionics off state and nice bezels too. I will probably get them from you for those reasons.
Anyways don’t forget to make a nice RealAir Turbine Duke engine gauge stack as well. That way I won’t have to make them myself. It looks like some of the Baron gauges also have “a similar structure” to the T Duke as well. The RealAir T Duke is my favorite because it doesn’t struggle to climb!
BTW, Saitek posted a newer driver 7_0_42_12 for the FIPS. Don’t know what the changes are though.
Jack
LikeLike
Thanks Jack for the note of new Saitek driver. Installed. No idea what’s been fixed or changed but works fine.
The engine stack for Baron 58 is done. It uses 3 FIPs and is compatible with default and Carenada verison. Yes, I have kept the RealAir in mind.
Tom
LikeLike
Hi Tom, I guess you know this. But FlyInside with Rift DK2 is your dream come true. Cheers Peter H.
Sent
LikeLike
Haven’t had any chance to try on it. VR should be the future.
Tom
LikeLike
Amazing timing for this article. I had planned on attempting to offload the gauges on a networked computer today!
I’m using the new Saitek drivers with 10 FIP’s and 3 other saitek modules (Auto Pilot, Radio and Switch panels). In total there are 25 USB devices hooked up to my system and I think its stressing out background IO. A couple of FIPs will stop working and lock up from time to time, especially if i go into a menu setting in FSX (i.e. Scenery, Weather, Date Time Season).
The main computer is fairly powerful with a i7 K4770 class chipped over-clocked to 4.2 Mghz. I’ve got 3 monitors in surround config using an nVidia 760gtx plus a Lenovo USB3 13″ touch monitor I use for the GTN750 GPS from flight 1. Since a real GTN750 uses a touch screen in the cockpit, the simulation with a touch monitor is pretty true to life.
Actually, can’t wait for Spad.Next to support fips then I could delegate all my saitek modules to a networked PC and do away with the unstable Saitek drivers.
Thanks!
LikeLike
Glad it helps.
LikeLike