
(Updated on: 24 October 2013) This is part three of the Turning Off the FIP series. This time is the AirSpeed Indicator.
 ==========

Similarly, save the image on the right to the \1024 folder where you keep the VS indicator (e.g. C:\Program Files (x86)\Saitek\DirectOutput\Gauges\1024) via the link below: https://dl.dropboxusercontent.com/u/25018674/Gauges-C172/C172_Gauges_130815_OFF/C172_AS_OFF.bmp
==========
Remember that the image must be saved as it is in BMP format — C172_ALT_OFF.bmp
==========
Open the C172_AS_130815.xml with Notepad or any text editor. The file should be one directory up from the \1024 folder (e.g. C:\Program Files (x86)\Saitek\DirectOutput\Gauges\)
==========
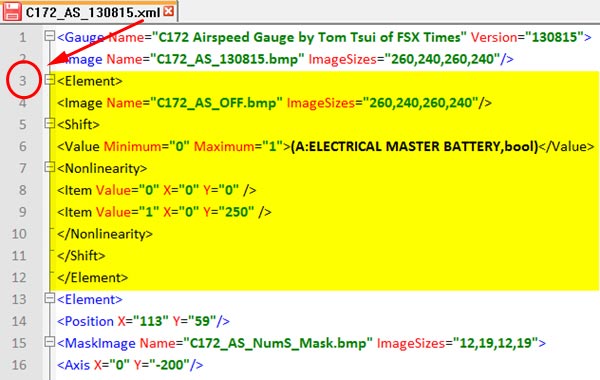
From line #3 in the file, type and insert the whole script as shown and highlighted in the picture below:
==========
Save the file and exit.
Run FSX as usual with the FIPs. You’ll see the AirSpeed Indicator (plus the Vertical Speed Indicator and Altimeter) now “turned off” when the Master Battery is off.
The OFF Masks for the remaining Tachometer and Integrated Fuel Gauges will come soon.

Turning off the FIP and complaining a bit about the Saitek FIP driver:
Hi Tom,
I remember reading about this easy “Switch off” procedure in the Saitek FIP user guide.
Something “not missing” in this old Saitek driver…
This is an easy way to turn off the display of the FIP on the hardware itself.
By pressing the “up” or “down” arrow button on the FIP scroll through your different gauges until you see the “Saitek serial number image” or one of the other images on the display.
Now while you see one of these pictures press only one of the “S1” to “S6” buttons on the left side of the FIP. This does not cut off the electric power of the FIP but the display will turn black now.
To turn on the FIP again just scroll with the “up” or “down” arrow button. The next available gauge will be displayed.
You can leave your FIP so it will reset to “default” on the next FIP restart (USB unplug/replug).
If you want to come back to “default” before restart just press whatever S1 to S6 button when you see the black display. The “Saitek serial number image” or one of the other images will be displayed again.
This procedure is not as good as your “Turn off the FIP” add-ons coded to be embedded in the gauge. However it’s quite convenient.
Something useful in the Saitek driver…
To my meaning the Saitek driver is really “weak”. Tom you know it better than me! When it comes to gauges coding there is a lot of missing commands.
I own five FIPs now. How many do you own? How many owners are we in the “Global Village”. We should all ask for a driver upgrade from Saitek. These FIPs are not cheap, they are good stuff and they are reliable. It’s just that old driver. It needs a good upgrade. I think skilled coders like you and all users deserve it. Every serious hardware company upgrades not only hardware but software as well. Why not Saitek?
The FIP has a diagonal display of 3.385 inches for about US$ 150.– a piece. That’s 44.30 bucks per inch! With 8 buttons and 2 rotating buttons but no brightness and no contrast settings! And a frustrating driver. How big is your monitor? Let’s say 23” only. At a rate of 44.30 per inch that would be more than 1’000.— US$. Probably a high standard hardware probably supplied with a web access to regular drivers upgrades. I think the Saitek FIPs are high standard hardware and that they only need a better driver. An up to date driver.
FSX Times readers if you have the time to read this you might have time to send a message to Saitek. All readers might have time to do that. They have a Customer Service and a Blog on their website.
Regards from LSGS,
Kim
LikeLike
Very well said Kim. I have repost your comment as a regular post so that more people can read it.
Tom
LikeLike
Hi Tom,
The “Turning Off the FIP” solution you created is eye candy and makes it more fun with these FIPs. Very nice artwork!
I want to try it. So I just downloaded the images you put in Dropbox. However, there is a problem with the image link in this post about “220:Turning Off the FIP#3 – AS Indicator”.
The link you provided refers to the “VS Indicator OFF” image instead of the “AS Indicator OFF” image.
Could you change it please.
Thanks and best regards from cloudy LSGS,
Kim
LikeLike
Woop. Thanks for the note. It’s been changed for download now.
Tom
LikeLike
I’ve been loving your 172 gauges, and finally got around to this tonight. I was met with many problems. Hopefully you can do some updating, or this may help others.
1st – When I copy/pasted the code from the post all of the ” were the wrong symbol. Not even the same throughout the code. So I went through and replaced them all. (Using Notepad++ like you are in your screenshots.)
2nd – The text code for the Vertical Speed Indicator and Altimeter both have the line:
(A:ELECTRICAL MASTER BATTERY,bool)
instead of:
(A:ELECTRICAL MASTER BATTERY,bool)
The screenshots do show it correctly.
3rd – When following the instructions to download the images, it saves a .jpg. This is as you mention a WordPress problem. Renaming it does not fix the image. I had to open them in an image editor and save them back out as a .bmp. This then worked. To support this the .jpg’s are around 40 KB, versus the original .bmp’s being about 120 KB. My .bmp’s created from the .jpg’s are about 180 KB. I don’t know if the conversion lost any quality. Perhaps when you’re done with all of them you can put your original .bmp’s together in a zip file?
But after working through those problems they are working great! It’s a really cool effect! I’m excited for the other two.
Do you have any plans to do any other C172 gauges? Attitude, Turn indicator, etc?
LikeLike
Ok, that didn’t format correctly… For number 2 its:
Value Minimum=”0″ Maximum=”1″ (A:ELECTRICAL MASTER BATTERY,bool) /Value
I pulled out the so it will hopefully get the point across. Verify with the screenshot to see how it should look. The same thing that bit me there may be the reason for the problem I mentioned…
LikeLike
Again… Sorry for so many reply’s..
“I pulled out the greater than and less than symbols so it will hopefully get the point across. “
LikeLike
Hi Waterman981,
Since there are many versions on my computer and wonder if I included the wrong files.
Thanks for the feedback and suggestion.
Currently working on something else and my head is spinning. Will have a look and get back and make edits if possible.
Turn Indicator — yes, will work on it
Attitude Indicator — probably no as the one I did for T210 is still valid.
Thanks again.
Tom
Tom
LikeLike
Oh! My code does not display, I am going to try other thing
“”
“”
” ”
“(A:AVIONICS MASTER SWITCH,bool)”
“”
“”
“”
” ”
“”
“”
“”
LikeLike
Hello,
I a little modified your code:
I place it in front last line, before ” ( )
(A:AVIONICS MASTER SWITCH,bool)
I have create an image 260×240 on grey bottom with a message in red.
Ex message : “Please Engage Avionics Master”
When you launches FSX, then kept silent chosen C172
You are “cold and Dark” The FIP shows a grey image with a message in red.
engage the Avionics Master and…Gauges appears
I tried with C172 A2A and that works very well
Sorry for my bad English!!!!!
Bye
++
LikeLike
Great stuff Tom!!
LikeLike
You’re welcome.
LikeLike